Wednesday, January 25, 2012

Candle Stick Jars


I made these a long time ago, and just never got around to posing about them. These are a lot of fun to make, and more fun to have. I first made these right before halloween, and filled them partially with candy corn, and stuck a flameless tea light in each. I got a lot of compliments on them. All you need is a set of candlesticks, mason jars with lids, paint, and super glue. I think it pretty much explains itself, but here is what I did.

First I painted the candlesticks and the lids to match. I painted these ones a dark brown. Then I made a chromatic black to paint on and wipe away to give it an antiqued look. You can use a paper towel or a rag to do this. I really love how that turned out. Next I super glued the jars to the candlesticks. Lastly, I filled them with fun goodies, and voila! Done!

I ended up making quite a few of these as people ask for them for gifts. Everyone has had a lot of fun thinking of things to put in them for every holiday and season. These were very easy, and turn out really cute! Pinterest has done us good :)

Grandkids Make Life Grand Sign


How cute is this!?! My sister actually made this one (She stole it from my board, dang her!). She got a pice of wood from the hardware store and painted it. The vinyl lettering she cut out on her vinyl cutter. She had her daughter decorate the pins. She gave this to my mom for Christmas, and it was one of her favorites, if not her absolute favorite gift. This was a really easy project, and turned out just as expected. Definitely a winner!

Laundry Detergent


I have seen a lot of "make your own laundry soap" pins. They all claim to cost 2 cents a load. Sounds great to me! A store bought box of detergent usually costs about 25 cents per load. So I tried it, and I love it! This is what I used:

1 bar Fels Naptha
1/2 bar Zote
2 cups Washing Soda
2 cups Borax

I first grated the Fels Naptha and the Zote in my blender. (I have an attachment that will do this and it makes it go SO fast!) Then I added the Washing Soda and the Borax. When the Fels Naptha and Zote are grated, they make big curls. I was worried this would interfere with the ability to dissolve completely (might not) so I decided to run it through the blender. It is now the exact consistency of store bought laundry detergent. In case you have a HE machine, this is HE safe! Awesome, right! You can leave out the Zote (but I love the smell of it!) if you have any kind of reaction to it. You also can replace it with any soap you know is safe for your skin, like Dove. This way you can make it completely hypoallergenic.

I have been using this detergent for a few months now and could not be happier. I have noticed that it cleans my clothes just as well as store bought detergent, and is a lot more gentle on my clothes. My lint catcher collects probably 1/4 of what it used to with a load of laundry. With the savings on the soap itself, and the savings of helping my clothes last longer, I am one happy camper!

Saturday, November 12, 2011

Make-up Remover Wipes

This is not the first time I have made these, nor will it be the last. I am absolutely in LOVE with these! I use them everyday, and don't think I will ever stop. I use them to clean my face with, my kids faces, and their bums. I changed to using these wipes to clean my face instead of cleanser, and have never looked back. Now that I have switched I realize my face soap was too harsh on my skin and causing me to break out. My skin looks 100 times better since using only these wipes. It took about two weeks to get used to cleaning my skin with oil, but now when I use them my skin feels all tight, just like before with the cleanser. Anyway, they are AMAZING, and super cheap. If you are going to make one thing you find on Pinterest, let this be it! Here is what you need:

Paper towel roll cut in half. (a nice strong brand like Brawny)
2 cups of warm water per half of paper towel roll.
2 big spoons full of coconut oil.
Something to store the wipes in. A Huggies wipe dispenser works great!
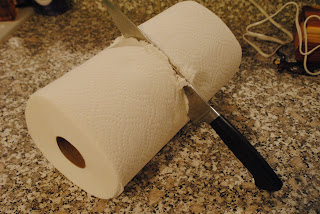
First, you have to have nice paper towels. The link that I read said to buy Brawny Select a Size. I bought the regular Brawny and am really glad that I did. If I had bought the select a size, they would be a third of the size smaller. One thing a really like about these wipes is the size. You need to cut the paper towel in half, and it is best to not use a serrated knife, so you don't get fuzzies everywhere.

This is where I take out the middle. The link I read said to do it after you soak the paper towels the solution, and it IS easier if you do it then, but I feel like you waste a lot of the coconut oil. You just have to work your finger around the tube and bend it up a little to get it out.
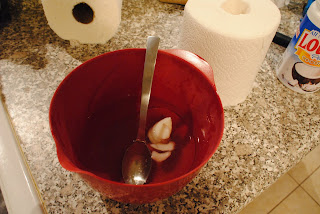

To help keep the wipes from growing mildew, I boil the water. I just throw it in the microwave for a few minutes and then add the coconut oil. That way the water is hot enough to melt it. Hot water from the tap will melt it also, the melting point for coconut oil is only 76 degrees Fahrenheit. I use my soup spoons and add two scoops of oil to the water.
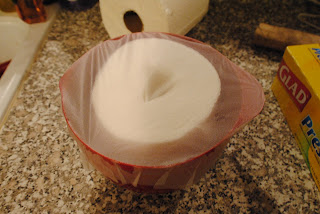
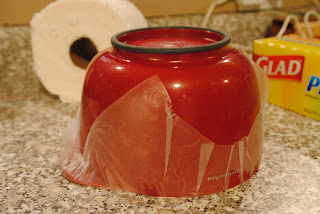
Next, just put the paper towels in the solution, cover it, and flip it over. Don't worry if your paper towels are taller than your container. Once they are wet they smash down really easily. Leave it upside down for at least five minutes so the solution can travel through the entire roll.

You are done! All you have to do now is put them in a container with a good sealing lid and enjoy! I use a Huggies wipe dispenser. After about two weeks they start to grow mildew (because they don't have any preservatives) so I don't recommend make more than half a roll at a time. I tried adding vinegar to make them last longer, but it didn't seem to make a difference. This time I am putting my container through the dishwasher on the sanitize cycle to see if that works better than just washing it, along with boiling the water. I would love to hear your thoughts on these, especially anything that helps make them last longer!

Friday, November 11, 2011

Argyle Wreath

I have seen a few argyle wreaths floating around pinterest, and love them. LOVE THEM! I love them. I started making one, and then decided, why not make four? So that is what I did. With this one, all I had to do was look at the picture and I figured out how to do it. It was very straight forward. I am really happy with the end result, and I am sure I will be wrapping a lot of wreaths in yarn in the future.

I found the easiest way to wrap the wreath is sitting at a table. Place your skein of yarn on the edge of the table and hold the wreath up in front of you. To wrap the warn around, put your arm through the center of the wreath, grab the skein and pull it toward you through the hole, then place it back on the table. For me, this was the gentlest on my arms.


I tied a knot and used a pin to finish off the yarn once I had wrapped the entire wreath. Then I put I dot of glue over that incase the yarn ever unravels.